
Comarcas Inteligentes
Site blog
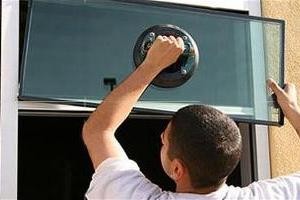
The Ultimate Guide to Double Glazed Window Repairs
Double glazed windows are a popular choice for house owners, offering much better insulation, noise decrease, and enhanced security. Nevertheless, like any home function, they can establish issues in time. Understanding the kinds of problems that can happen and how to resolve them is important for keeping windows effective and elegant. This blog site post will explore double-glazed window repairs, common issues, and upkeep pointers.

Comprehending Double Glazed Windows
Before diving into repair alternatives, it's vital to understand how double glazed windows work. A double glazed window includes 2 panes of glass separated by a space filled with gas, frequently argon or krypton. This style produces a barrier that reduces heat loss, sound transfer, and condensation.
Benefits of Double Glazed Windows
| Benefit | Description |
|---|---|
| Increased Energy Efficiency | Minimized heat transfer reduces energy expenses. |
| Sound Insulation | Efficiently moistens external noise. |
| Enhanced Security | Double layers of glass offer better security. |
| Minimized Condensation Inside Double Glazing | Reduces the probability of moisture accumulation. |
| UV Protection | Protects home furnishings and flooring from sun damage. |
Common Problems and Solutions
Even premium double glazed windows can experience problems over time. Below are some common issues together with their possible solutions.
1. Condensation Between the Panes
Condensation trapped between the two panes indicates a seal failure. When this happens, moisture gets in the area, resulting in fogging.
Option:
- Repair Options: Seal replacement or complete unit replacement if damage is severe.
- DIY Option: For minor cases, utilizing a dehumidifier indoors might assist reduce some symptoms.
2. Hard to Open/Close Windows
Double glazed Misted Windows may get stuck due to misalignment or dirt accumulation.
Service:
- Cleaning Tracks: Clean the window tracks and lubricate the locking systems.
- Professional Adjustment: If the misalignment persists, think about hiring a professional to realign the window frame.
3. Drafts
Feeling drafts from double glazed windows can represent a damaged seal or frame.
Solution:
- Check Seals: Inspect for noticeable spaces or cracks and apply weather stripping or caulking as needed.
- Professional Assessment: For major gaps, speak with a professional to evaluate if the window requires replacing.
4. Cracked Misted Glass Replacement
Fractures may appear due to impacts, temperature level changes, or making defects.
Option:
- Temporary Fix: Use clear tape to minimize stress on the crack.
- Professional Repair: For security, call a window repair service to examine whether the glass can be changed or if a brand-new system is needed.
5. Structure Damage
The frame around double glazed windows can end up being damaged with time due to weather or maintenance problems.
Service:
- Repair Options: Minor damage can frequently be filled or painted; more substantial damage may need replacing the whole frame.
Repair vs. Replacement
Deciding whether to repair or replace double glazed windows depends on a number of factors:
| Factor | Repair | Replacement |
|---|---|---|
| Cost | Normally more affordable (specifically small repairs) | Higher preliminary investment but can offer much better energy performance |
| Time | Quick fixes can often be finished quicker | May require time for purchasing and installation |
| Durability | Repairs might just extend the lifespan for a while | New windows generally last longer |
| Energy Efficiency | Might not attain the same effectiveness as new units | Best energy performance with contemporary technology |
Upkeep Tips for Double Glazed Windows
Preventative upkeep is vital to making the most of the life-span and efficiency of double glazed windows. Here are some upkeep ideas:
- Regular Cleaning: Use mild soap and water for the external glass. Prevent abrasive materials which can scratch the surface.
- Inspect Seals: Regularly inspect the seals for fractures or wear and replace any broken parts immediately.
- Lubricate Mechanisms: Regularly lubricate hinges, locks, and any movable parts to make sure smooth performance.
- Screen Performance: Watch out for moisture build-up or condensation. If concerns emerge, speak with a professional right away.
- Keep Airflow Clear: Ensure window tracks are clear of dirt and obstructions.
Often Asked Questions (FAQs)
Q1: How do I know if my double glazed windows require repair?
- Try to find signs of condensation in between panes, drafts, trouble opening/closing windows, or noticeable cracks.
Q2: Can I repair double glazed windows myself?
- Small concerns can often be resolved through DIY approaches, but substantial problems are best handled by experts.
Q3: How much does it cost to repair double glazed windows?
- Repair expenses can vary extensively based upon the kind of repair required. Regular repairs generally vary from ₤ 100 to ₤ 300, while significant repairs or replacements can surpass ₤ 500.
Q4: How long do double glazed windows last?
- With appropriate maintenance, double glazed windows can last in between 15 to 30 years.
Q5: Are double glazed window repairs covered by insurance coverage?
- It depends on the particular policy information. It's suggested to examine with your insurance company to identify protection.
Double glazed windows provide outstanding advantages when operating correctly. Understanding common issues and upkeep techniques can help house owners lengthen the life and effectiveness of their windows. Whether choosing for repairs or replacements, addressing issues quickly is crucial to making sure continued convenience and performance in your home.
With routine maintenance and timely repairs, property owners can take pleasure in the complete benefits of their double glazed windows for lots of years to come.
![]()
A Comprehensive Guide to Wall Mounted Electric Fireplaces
The beauty and heat of a flickering fire have long been a staple in homes, specifically throughout the cooler months. However, traditional fireplaces can be troublesome to install and frequently require significant maintenance. Get in the wall-mounted electric fireplace-- a modern, smooth, and user-friendly alternative. This guide will explore the benefits, considerations, and regularly asked questions surrounding Wall Hanging Electric Fireplace-mounted electric fireplaces.
What is a Wall Mounted Electric Fireplace?
A wall-mounted electric fireplace is a contemporary heating solution that is installed on the wall, looking like a framed art work. Rather than counting on wood, gas, or other combustible products, these fireplaces use electricity to produce flame effects and heat, developing an atmosphere suitable for modern living areas.
Key Features
| Function | Description |
|---|---|
| Style | Smooth and modern visual, often customizable |
| Flame Technology | LED technology for reasonable flame results |
| Heating Options | Adjustable heat settings for efficient temperature control |
| Remote Control | Hassle-free operation from a range |
| Installation | Easier setup-- no need for venting |
Advantages of Wall Mounted Electric Fireplaces
Wall Mounted Fireplace Heater-mounted electric fireplaces included various benefits:
1. Space-Saving Design
Whether in small apartments or spacious homes, these fireplaces can be suited places where a basic fireplace would not be useful. They take up minimal floor space, making them best for relaxing nooks or living rooms.
2. No Ventilation Required
Considering that they do not produce smoke or emissions, Wall Mounted Fireplace Heater-mounted electric fireplaces do not require a chimney or venting system. This makes them flexible for different placements, consisting of bed rooms and workplaces.
3. Relieve of Use
With uncomplicated installation and operation, users can take pleasure in heat and atmosphere at the push of a button. Many models feature remote control for included convenience.
4. Safety Features
Most electric fireplaces are equipped with safety functions such as cool-to-the-touch glass and automated shut-off settings, making them safe for households with kids or animals.
5. Energy Efficiency
Electric fireplaces can frequently warm a room more effectively than conventional systems. They take in less energy and have adjustable heat settings to control energy usage based upon requirements.
6. Customizable Flame Effects
Users can often pick from a range of flame results, from sensible flame patterns to colored LED lighting, permitting total personalization based upon mood and decor style.
Factors to consider Before Buying
When considering the purchase of a Wall Hung Electric Fireplace-mounted electric fireplace, the list below elements ought to be examined:
1. Space Size
It's important to select an electric fireplace that can effectively warm your space. The majority of designs will show the square video they can efficiently warm.
2. Design and Finish
Different styles and surfaces are readily available to match your home design. Think about whether you choose a minimalist, modern style or something more standard.
3. Heat Output
Search for the BTU (British Thermal Unit) ranking, which indicates the heat output of the system. A higher BTU rating implies more heating power.
4. Setup Requirements
Although installation is primarily simple, some models might require professional setup. Examine whether you are comfy with DIY installation or if you require support.
5. Brand name and Warranty
Think about acquiring from trusted brand names that provide guarantees for their products. This guarantees peace of mind and quality control.
Top 5 Wall Mounted Electric Fireplaces
| Brand name | Model | Heating Capability | Design Style | Rate Range |
|---|---|---|---|---|
| Dimplex | IgniteXL 50 | Approximately 1,000 sq. ft. | Modern & & Sleek ₤ 1,600 - ₤ 2,200 | |
| Amantii | 48" Electric Fireplace | Approximately 400 sq. ft. | Contemporary | ₤ 1,800 - ₤ 2,500 |
| Touchstone | 50" Electric In Wall Fireplace Fireplace | Approximately 400 sq. ft. | Built-in Style | ₤ 500 - ₤ 800 |
| AKDY | Wall Mount Electric | Approximately 300 sq. ft. | Modern & & Elegant | ₤ 400 - ₤ 600 |
| ClassicFlame | 36" Wall Mounted | As much as 400 sq. ft. | Traditional | ₤ 450 - ₤ 750 |
Frequently Asked Questions (FAQ)
Q1: How much does it cost to run a wall-mounted electric fireplace?
The cost differs based upon local electrical energy rates and the heating requirements of your area. Usually, it costs about ₤ 0.30 to ₤ 0.50 per hour to operate on high heat settings.
Q2: Can wall-mounted electric fireplaces be utilized without heat?
Yes, lots of models allow the flame impact to run individually of the heating function, allowing you to enjoy the ambiance without extra warmth.
Q3: How do I set up a wall-mounted electric fireplace?
Setup typically involves installing the fireplace unit to the Wall mounted electric fireplaces utilizing brackets and screws provided with the system. Follow the maker's guidelines carefully for best outcomes.
Q4: Are wall-mounted electric fireplaces safe for kids and animals?
While no heating home appliance is totally without danger, wall-mounted electric fireplaces are usually safe due to their cool-to-the-touch front glass and safety shut-off functions.
Q5: Do I need to clean my electric fireplace?
Very little maintenance is required, however routine dusting and cleansing of the glass front may be essential to preserve clearness and aesthetic appeals. Avoid using extreme chemicals.
Wall-mounted electric fireplaces have actually reinvented the way house owners approach heating and atmosphere. With their versatile styles, ease of installation, and safety functions, they make an excellent substitute for standard designs-- perfect for both modern and timeless interiors. As they grow significantly popular, it's clear these systems are more than simply a trend; they represent a long-term investment in home comfort.
The Comprehensive Guide to Door Repairing: Techniques, Tips, and FAQs
Doors are essential components of any structure, providing security, privacy, and visual appeal. However, like any component in a home, they can encounter numerous concerns in time. Whether it's a squeaky hinge, a stuck door, or a harmed frame, understanding the essentials of door repairing can conserve house owners time, cash, and frustration.
Typical Door Problems
Before diving into the repairing strategies, it's crucial to recognize the common door problems one may encounter:
| Problem | Description |
|---|---|
| Squeaky Door | A loud hinge that triggers irritation during opening/closing. |
| Sticking Door | A door that won't open or close efficiently, often due to swelling or misalignment. |
| Damaged Door Frame | Fractures or divides in the door frame that affect the door's fit. |
| Loose Hinges | Hinges that are either used out or not securely secured, triggering instability. |
| Door Handle Issues | Handles that are broken, stuck, or malfunctioning. |
| Weatherstripping Failures | Worn-out or missing weatherstripping that results in drafts or noise contamination. |
By identifying the issue at hand, property owners can identify the best technique to double glazed window repair it.
Tools Needed for Door Repairing
Before starting a upvc windows repair task, guarantee you have the following tools easily offered:
| Tool | Use |
|---|---|
| Screwdriver | For tightening or getting rid of screws from hinges and deals with. |
| Hammer | For changing the frame or lightly tapping on misaligned locations. |
| Wood Glue | Necessary for repairing cracks in wooden doors or frames. |
| Sandpaper | For smoothing rough edges or surfaces after repairing. |
| Determining Tape | To measure door size and gaps properly. |
| Level | To ensure the door is hanging straight. |
| Pliers | Beneficial for eliminating and window repairman near me (wifidb.science) grasping hardware. |
| Replacement Parts (if required) | New hinges, manages, or weatherstripping as required. |
Having these tools on hand will facilitate the repair procedure significantly.
Step-by-Step Door Repairing Techniques
1. Repairing Squeaky Hinges
Squeaky hinges can be quickly fixed. Here's how:
- Step 1: Identify the squeaky hinge.
- Step 2: Apply a couple of drops of lubricant (like WD-40 or silicone spray) directly on the hinges.
- Step 3: Open and close the door several times to work the lubricant into the hinge. Repeat if essential.
2. Resolving Sticking Doors
A sticky door may require leveling or planing the edges.
- Step 1: Check if the door frame is square. Use a level to see if the door lines up correctly.
- Step 2: If misalignment is kept in mind, change the hinges (unscrew and reposition).
- Action 3: If the door requires cutting, utilize an aircraft to slash off a percentage of the edge.
3. Fixing a Damaged Door Frame
Fractures or splits can be repaired as follows:
- Step 1: Clean the broken area. Eliminate any loose or broken wood.
- Step 2: Apply wood glue into the fracture and clamp it till dry.
- Step 3: Once dry, sand down any rough edges.
4. Tightening Up Loose Hinges
Loose hinges must be tightened up for stability:
- Step 1: Identify which screws are loose.
- Step 2: Use a screwdriver to tighten up all screws. If screws are removed, replace them with a little bigger ones.
5. Repairing Door Handles
Malfunctioning door deals with requirement attention:
- Step 1: Remove the manage utilizing a screwdriver.
- Action 2: Inspect internal systems for any visible damage.
- Step 3: Replace any damaged parts or the handle itself.
6. Changing Weatherstripping
Missing out on or worn weatherstripping can be replaced quickly:
- Step 1: Measure the length needed for replacement.
- Step 2: Remove old weatherstripping carefully.
- Step 3: Clean the surface area and apply new weatherstripping, guaranteeing a snug fit.
Preventative Maintenance Tips
To prolong the life of doors and reduce repairs, homeowners must consider the following maintenance pointers:
- Regular Lubrication: Lubricate hinges and locks every 6 months.
- Inspect Alignment: Periodically inspect the positionings of doors and frames.
- Check Locks Regularly: Ensure locks are operating smoothly to avoid future issues.
- Look for Moisture: Control humidity levels inside to avoid door swelling.
- Tidy Door Surfaces: Regular cleaning helps lessen wear and tear.
FAQ: Door Repairing
What should I do if my door won't lock correctly?
If a door will not latch, it might be misaligned. Inspect the hinges for tightness and take a look at whether the door or frame is distorted.
How can I prevent my door from squeaking?
Routinely applying a lubricant on the hinges will prevent squeaking. Make sure screws are tightened up to prevent wear.
When should I consider changing my door?
If a door has comprehensive damage, such as large splits, rot, or is beyond repair, replacement might be the finest option.
Can I fix a door that is inflamed due to humidity?
Yes, cutting or planing down the edges of an inflamed door is a common solution. You can likewise use a dehumidifier to draw wetness from the air.
What if my weatherstripping doesn't stick anymore?
If the adhesive doesn't hold, you might require to clean up the surface areas thoroughly and reapply with a stronger adhesive or consider using replacement weatherstripping that doesn't require adhesive.
Is it a good idea to employ a professional for door repairs?
While numerous repairs can be done DIY, employing an expert is recommended for considerable structural problems or if you're unsure on how to continue.
Understanding basic door repairing methods can greatly help property owners in preserving their doors, extending their lifespan, and preventing costly replacements. Equipped with the right tools and knowledge, tackling common door concerns can become an achievable job. Routine maintenance will guarantee doors operate smoothly and remain visually pleasing in any home setting. Remember, a well-functioning door not just adds to security but likewise improves the convenience and environment of a home.
![]()
The Ultimate Guide to Finding Cheap Coffee Beans: A 1kg Buyer's Guide
Coffee is more than simply a beverage; it's a routine for many, a busy market, and a comfortable minute of indulgence. For the coffee lovers who can't picture starting their day without that necessary cup, the hunt for quality beans at an affordable price can sometimes feel like looking for a needle in a haystack. This guide will dive into the very best alternatives for buying 1kg of cheap coffee beans, providing informative information to help you discover quality without breaking the bank.
Why Buy Coffee Beans wholesale?
Buying coffee beans wholesale is not just affordable however likewise practical. Here are a couple of reasons getting a 1kg bag of coffee beans can be helpful:
- Cost-effectiveness: Usually, acquiring bigger amounts minimizes the cost per kg.
- Convenience: Fewer journeys to the shop indicates more time to enjoy your coffee.
- Freshness and Quality: Many roasters sell beans soon after roasting, ensuring you get fresher coffee.
What's on the marketplace?
When considering cheap coffee beans, it's vital to compare numerous options to identify what meets your tastes and budget plan. Below is a table showcasing some of the most popular kinds of coffee beans available for around 1kg.
| Brand name | Type | Price (Approximate) | Flavor Profile | Roast Level |
|---|---|---|---|---|
| Arabica Bliss | Arabica | ₤ 15 | Fruity and mild | Medium |
| Strong Brew | Robusta | ₤ 12 | Earthy and strong | Dark |
| Daily Grind | Mix | ₤ 14 | Nutty with chocolate notes | Medium |
| Budget plan Beans | Arabica/Robusta | ₤ 10 | Well balanced and smooth | Light |
| Gourmet Rich | Single Origin | ₤ 18 | Floral with citrus undertones | Light |
Popular Bean Sources
Cheap coffee does not indicate you need to jeopardize on quality. Here are a couple of sources to consider when looking for budget-friendly coffee beans:
- Local Roasters: Often offer deals for bulk purchases. Look for community spots.
- Grocery stores: Chains frequently carry their own brand of coffee at a lower price point.
- Online Retailers: Websites like Amazon often have substantial selections, and you can compare prices quickly.
- Wholesale Clubs: Membership-based shops frequently have bulk options at an affordable price.
Factors to Consider When Buying Coffee Beans
Discovering the best cheap coffee beans needs thinking about a number of factors beyond just price. Here's a breakdown of what to keep an eye out for:
1. Type of Bean
- Arabica vs. Robusta: Arabica beans are usually smoother and more delicious, while Robusta is more powerful and has higher caffeine content. Blends can use the best of both worlds.
2. Roast Level
- Light, Medium, or Dark: The roast level impacts the flavor, Coffeee aroma, and acidity of coffee. Light roasts protect the bean's natural attributes, while dark roasts offer a bolder taste.
3. Flavor Profile
- Choose beans that match your taste preferences. Search for descriptors that attract you like fruity, nutty, or chocolatey.
4. Freshness
- Coffee is best taken pleasure in fresh. When possible, examine the roast date on the product packaging and attempt to select beans that were roasted no greater than 2 weeks before purchase.
5. Ethical Sourcing
- For the socially mindful consumer, it is important to consider whether the coffee is morally sourced. Look for Fair Trade or Rainforest Alliance certifications.
Tips for Storing Your Coffee Beans
When you've secured your cheap 1kg of coffee, proper storage is essential to retaining freshness and flavor. Here are some pointers:
- Keep it Cool and Dark: Store beans far from light and heat, ideally in a kitchen.
- Air-tight Containers: Use airtight containers to prevent oxidation.
- Grind as Needed: Whole beans keep taste longer than pre-ground coffee. Grind prior to brewing for the best taste.
FAQs About Buying Cheap Coffee Beans
1. Are cheap coffee beans of lower quality?Not necessarily. While price can be an indication of quality, many economical brands supply quality beans that taste excellent.
2. How should I brew cheap coffee to maximize taste?Using proper brewing strategies-- such as water temperature, coffee-to-water ratio, and the grind size-- can improve even spending plan coffee.
3. Where can I buy cheap coffee beans online?Many respectable online merchants exist, including Amazon, specialty coffee sites, and local roasters that use shipping.
4. Is it worth it to buy 1kg of coffee beans?For regular coffee drinkers, buying 1kg can be a cost-efficient choice that conserves money in the long run.
5. The length of time do coffee beans last?When correctly stored, whole coffee beans can last for a number of months, often even up to a year without losing much taste.
Finding cheap coffee beans does not need to jeopardize quality. With the ideal understanding and tools, coffee lovers can delight in wonderful brews without straining their spending plan. By checking out various sources, understanding the necessary consider picking coffee beans, and making sure appropriate storage, coffee lovers can embark on a flavorful journey that fits their palate and their pocket.
Whether you choose a robust espresso or a fragile pour-over, there are plenty of choices available for 1kg of economical coffee beans. Happy developing!
Understanding Window Repairs: A Comprehensive Guide
Windows are a crucial part of any home, providing natural light, Glass repairs Near me ventilation, and a view of the outside world. However, with time, they can end up being harmed due to a range of elements. Whether it's a little fracture, a broken seal, or water damage, window repairs are essential to preserving the stability and aesthetics of a home. This post will delve into numerous aspects of window repairs, including kinds of damages, door repair near me methods, expenses, and often asked questions.
Typical Types of Window Damages
Comprehending the kinds of window damages can help homeowners take prompt action and prevent more expensive repairs later. Here's a breakdown of typical window concerns:
| Type of Damage | Description | Possible Causes |
|---|---|---|
| Split Glass | Visible fractures or chips in the glass surface area | Weather changes, impact from objects |
| Broken Seal | Failure of the seal in between double/glass panes, resulting in misting | Age, thermal stress |
| Decomposing Frames | Decay of wood frames due to exposure to wetness | Poor drainage, prolonged humidity |
| Improper Operation | Windows that won't open or close properly | Dirt accumulation, misalignment |
| Drafts | Undesirable air flow around window edges | Inappropriate installation or aging seals |
| Water Leaks | Water going into the home around the frame | Harmed seals, incorrect installation |
Repair Techniques for Window Damages
Once the type of damage has actually been identified, numerous repair a window strategies can be utilized to resolve the concern successfully. Repair methods may differ depending upon the severity of the damage and the window type.
1. Glass Repair/Replacement
- Minor Cracks: Small fractures can in some cases be fixed using a glass adhesive resin. This method includes cleaning the area, applying the adhesive, and allowing it to treat.
- Substantial Damage: When fractures are comprehensive or in safety glass, replacement of the entire glass unit might be necessary.
2. Resealing Windows
- Broken Seal: In cases of condensation in between dual-pane glass, resealing might be needed. This typically includes eliminating and replacing the window sash or, in many cases, changing the entire window.
3. Frame Repair
- Rotting Wood Frames: Affected locations can be cut out and changed with new wood. Additionally, using a wood hardener can lengthen the life of the frame.
- Vinyl/Aluminum Frames: For non-wood frames, repairing dents or scratches is frequently attainable with specialized kits available at home improvement stores.
4. Weatherstripping and Caulking
- Drafts and Air Leaks: Installing or changing weatherstripping can obstruct drafts. Using caulk around window frames and seals will also help improve insulation.
5. Expert Help
For substantial damage, such as structural problems or several window repairs, consulting with an expert window repair double glazing service is often the very best strategy. Experts have the tools and experience necessary to handle complex repairs safely and effectively.
Expense of Window Repairs
The expense of window repairs can vary widely based upon elements such as kind of repair, materials utilized, region, and the intricacy of the job. Here's a rough breakdown:
| Repair Type | Typical Cost Range (GBP) |
|---|---|
| Minor Glass Repair | ₤ 50 - ₤ 100 |
| Glass Replacement | ₤ 200 - ₤ 600 |
| Resealing Windows | ₤ 200 - ₤ 500 |
| Weatherstripping | ₤ 20 - ₤ 100 |
| Frame Repair | ₤ 100 - ₤ 400 |
| Expert Services | ₤ 150 - ₤ 1000+ |
Tips to Save on Window Repair Costs
- Regular Maintenance: Clean windows and check seals occasionally to catch issues early.
- DIY Fixes: Simple repairs like resealing or removing particles can be done by the property owner.
- Get Multiple Quotes: Always compare costs from different company to ensure you're getting a fair price.
FAQs About Window Repairs
1. How do I know if my windows need to be fixed?
Signs include noticeable cracks, drafts, condensation between glass panes, and difficulty opening/closing windows.
2. Can I repair my windows myself?
Lots of small repairs, such as resealing or replacing weatherstripping, can be done by homeowners. Nevertheless, for extensive damage, it's typically best to speak with a professional.
3. What products are best for window frames?
Wood, vinyl, and aluminum each have their benefits. Wood is visual however needs more maintenance, whilst vinyl is durable and low-maintenance. Aluminum is strong however may perform temperature.
4. For how long do window repairs take?
Repair times can differ; basic fixes might take a couple of hours, while full replacements can take a day or more.
5. Is it necessary to change all windows if one is damaged?
Not necessarily. Private windows can typically be repaired or replaced without needing to do the entire home.
6. What can I do to prevent window damage?
Regular maintenance, such as checking and replacing weatherstripping, keeping frames tidy, and making sure correct drain around the window area can assist.
Window repairs to upvc windows, while in some cases overlooked, are vital in maintaining a home's comfort, safety, and aesthetic appeal. Homeowners need to stay watchful for signs of window damages and act quickly to address them. Whether through easy DIY techniques or enlisting the help of specialists, keeping windows in excellent condition will improve the home's worth and reduce prospective energy expenses. Routine maintenance and prompt repairs will keep windows practical and ensure they continue serving their purpose efficiently for years to come.

Andersen Window Handle Replacement: A Comprehensive Guide
Andersen Windows is renowned for its top quality products, which are created to stand the test of time. Nevertheless, similar to any other element in a home, window handles might end up being worn, harmed, or obsoleted, necessitating replacement. This guide will check out the numerous kinds of Andersen window handles, offer you with the actions required for replacement, and respond to often asked concerns about the process.
Tabulation
- Overview of Andersen Window Handles
- Types of Andersen Window Handles
- Table: Comparison of Window Handle Types
- Tools and Materials Needed
- Step-by-Step Guide Where To Buy Window Handle Replacement Replace an Andersen Window Handle Cover Replacement Handle
- Upkeep Tips for Window Handles
- FAQs about Andersen Window handle replacement (xrotica.ch)
- Conclusion
1. Summary of Andersen Window Handles
Window handles are the essential fittings that permit house owners to open, close, and secure their windows. For Andersen Window systems, handles must not only match the function however also emphasize the total aesthetic of the window. Gradually, handles can break or become non-functional, making replacement an essential job to maintain efficiency and security.

2. Kinds Of Andersen Window Handles
Andersen uses a variety of window handle types, each customized to particular window styles. Comprehending these variations is important in choosing the appropriate replacement alternative.
Table: Comparison of Window Handle Types
| Window Type | Handle Style | Functionality |
|---|---|---|
| Double-Hung Vinyl Window Handle Replacement | Crank Handle | Helps open and close with a turning system. |
| Casement Window | Infinitely Adjustable | Enables the window to be opened to different angles. |
| Sliding Window | Finger Pull | Easy to utilize for sliding action, normally situated at the center. |
| Awning Window | Crank Handle | Comparable to casement but created for top-opening windows. |
| Single-Hung Window | Latch Handle | Simple system that secures the window in location. |
3. Tools and Materials Needed
Before starting the replacement, make certain you have the following tools and materials useful:
Tools
- Screwdriver (depending on the screws utilized-- Phillips or flat-head)
- Pliers (for removing persistent screws or handles)
- Utility knife (to eliminate any adhesive if necessary)
- Tape measure (to measure the proper size for the brand-new handle)
- Level (guarantee the new handle aligns properly)
Materials
- Replacement Andersen window handle (specific to your window type)
- Screws (if not included with the new handle)
- Lubricant (to make sure smooth operation post-installation)
4. Step-by-Step Guide to Replace an Andersen Window Handle
Replacing an Andersen window handle can be achieved with relative ease, even for those with minimal DIY experience. Follow these steps for a successful handle replacement:
Step 1: Remove the Old Handle
- Determine the Type of Handle: Determine whether your current handle is a crank, latch, or pull type.
- Loosen the Handle: Using the suitable screwdriver, eliminate the screws that secure the handle in place.
- Take Off the Handle: Gently pull the handle out, being cautious not to harm surrounding elements.
Action 2: Prepare the Area
- Clean the Handle Area: Wipe the area around the opening with a soft cloth.
- Inspect for Damage: Ensure there are no additional problems (like broken parts) that need resolving before setting up the brand-new handle.
Step 3: Install the New Handle
- Position the New Handle: Line up the brand-new handle with the opening, ensuring it collaborates with any screw holes from the previous handle.
- Place Screws: Gently insert screws into the holes and secure them without overtightening.
- Test the Mechanism: Test whether the new handle runs smoothly and aligns correctly. Make adjustments if essential.
Step 4: Finalize Installation
- Lube if Needed: Apply a lube to moving parts for easier operation.
- Re-Check Alignment: Use a level to ensure the handle is straight and correctly placed.
- Tidy Up: Dispose of old parts responsibly and clean your workspace.
5. Maintenance Tips for Window Handles
To extend the life expectancy of your brand-new window handle, consider the following upkeep tips:
- Regular Cleaning: Wipe down handles with a gentle service to avoid dirt accumulation.
- Examine for Damage: Periodically inspect handles for wear and tear, especially after severe weather condition.
- Lube Moving Parts: Use a silicone spray or graphite powder regularly to preserve smooth operation.
6. Frequently Asked Questions about Andersen Window Handle Replacement
Q1: How do I know which handle to purchase?
A: Look for determining functions on your current handle or refer to Andersen's product brochure, which describes replacement choices for different Affordable Window Handle Replacement types.
Q2: Can I change the window handle myself?
A: Yes, changing an Andersen window handle is a manageable DIY job, particularly when you have the right tools and follow the guidelines provided.
Q3: What should I do if the replacement handle does not fit?
A: Double-check the model number and requirements of your original handle. It's likewise helpful to return or exchange the incorrect handle at the point of purchase.
Q4: How long does the handle replacement process take?
A: Generally, replacing a window handle shouldn't take more than 30 minutes to an hour, depending on your experience level.
Q5: What if I'm uncomfortable performing the replacement?
A: If you choose not to undertake the task yourself, consider employing a professional handyman or contact Andersen for assistance.
7. Conclusion
Changing an Andersen Window Handle Replacement Company handle can significantly enhance the performance and visual appeal of your windows. With the right tools and a clear understanding of the steps involved, property owners can successfully replace handles without needing professional support. By staying proactive about upkeep and routine checks, you'll guarantee that your windows remain in good working order for several years to come. However, always remember, if in doubt-- seek support from a professional to prevent any incidents.
Understanding Drill Tests: Importance, Types, and Implementation
In contemporary engineering, building, and geological investigation, drill tests are essential for gathering information and assessing the physical residential or commercial properties of various materials. These tests act as crucial tools in many fields, from building and construction tasks to ecological assessments. This article digs into the basics of drill tests, their numerous applications, and how they can be effectively implemented to ensure reputable results.
What is a Drill Test?
A drill test includes the procedure of boring into the earth or another material to extract samples for analysis. This method allows experts to examine soil, rock, and other products, offering critical info concerning their structure, stability, and suitability for specific tasks.
Key Components of a Drill Test
- Drilling Equipment: This consists of drilling rigs, augers, and rotary drills.
- Sampling Techniques: Various techniques can be used, such as core tasting and split-spoon sampling.
- Analysis: After extraction, samples undergo numerous tests to assess their residential or commercial properties, consisting of wetness content, density, and shear strength.
Significance of Drill Tests
Drill tests serve numerous important functions in project preparation and advancement. Their main significance can be summarized as follows:
| Importance | Description |
|---|---|
| Website Characterization | Assists identify and Elektro Bohrmaschine Angebot (fkwiki.win) evaluate the geological characteristics of a location. |
| Threat Mitigation | Minimizes the threats related to ground instability throughout building and construction. |
| Design Optimization | Supplies information that aids in optimizing the design of structures and foundations. |
| Environmental Impact | Assesses prospective ecological impacts and help in regulatory compliance. |
Kinds Of Drill Tests
There are various types of drill tests, each suited for specific applications. Below, we define a few of the most common drill screening techniques.
| Kind Of Drill Test | Description |
|---|---|
| Core Drilling | Involves extracting cylindrical cores of material for analysis. |
| Auger Drilling | Makes use of a screw-like tool to remove soil or rock, permitting for tasting. |
| Percussion Drilling | Includes driving a drill bit into the ground utilizing a hammering action. |
| Sonic Drilling | Utilizes high-frequency sound waves to permeate products, producing minimal disruption. |
| Hollow Stem Auger Drill | Permits synchronised tasting and casing installation. |
Picking the Right Drill Test
The choice of a specific drill test depends upon several factors, such as:
- Soil and Rock Type: The geological composition will determine which technique is more reliable.
- Task Goals: Understanding the purpose of the drilling is vital in choosing.
- Ecological Considerations: The prospective effect on surrounding communities should also be taken into account.
Execution of Drill Tests
To bring out a drill test efficiently, it is important to follow a structured technique. The application procedure can be broken down into several crucial actions:
Site Preparation:
- Conduct preliminary website studies to examine availability and environmental impact.
- Acquire required permits and approvals from regulative bodies.
Selecting the Equipment:
- Choose suitable drilling equipment based on site conditions and screening requirements.
Carrying Out the Drill Test:
- Execute the drill test according to recognized procedures.
- Make sure that samples are gathered methodically and protected.
Evaluating the Samples:
- Send samples to a lab for detailed analysis.
- Usage strenuous testing approaches to assess the engineering homes of the products.
Documentation and Reporting:
- Document all findings thoroughly.
- Prepare in-depth reports on results, analyses, and recommendations.
Table: Summary of the Drill Test Implementation Steps
| Action | Description |
|---|---|
| 1. Website Preparation | Survey the site and Schlagbohrmaschine 1000 Watt Test Vergleich acquire necessary permits. |
| 2. Devices Selection | Choose drills based upon geological conditions. |
| 3. Conducting the Test | Execute the drilling while maintaining safety standards. |
| 4. Schlagbohrmaschine 1000 Watt Test Vergleich Analysis | Analyze drawn out samples in a laboratory setting. |
| 5. Reporting Findings | File and present the results adequately. |
Often Asked Questions (FAQs)
1. What aspects affect the choice of drill test approach?
The choice of a drill test approach is influenced by the website's geological conditions, the specific objectives of the job, and factors to consider associated with environmental impact.
2. How long does a common drill test take?
The duration of a drill test can differ considerably. It may take anywhere from a few hours to several days, depending upon factors such as the depth of drilling required and the type of materials involved.
3. Are there any threats related to drill tests?
Yes, prospective dangers include environmental disturbance, damage to delicate locations, and hazards to workers if safety procedures are not followed. Careful planning is essential to mitigate these risks.

4. What kind of information can drill tests supply?
Drill tests can yield a wealth of information, including information on soil structure, wetness content, strength specifications, and overall site stability, which is crucial for task planning and execution.
5. How can the results of drill tests impact building tasks?
The outcomes can considerably influence task preparation, such as determining the kind of foundation needed, examining material requirements, and addressing potential environmental concerns, eventually forming the success of the job.
Drill tests are important to the fields of building and construction, engineering, and ecological science. By providing extensive knowledge of subsurface conditions, they play an essential role in accomplishing effective task outcomes. Familiarity with the various types of drill tests, their significance, implementation, and mindful factor to consider of their ecological impact ensures notified decision-making and enhanced security in engineering practices. Buying thorough drill tests not just alleviates risks but optimizes styles and contributes to the sustainability of advancement projects.
Unleashing Power and Portability: The Makita Battery-Powered Chainsaw
In the world of outside power tools, chainsaws are essential for a variety of tasks-- from tree trimming and firewood cutting to felling timber. While gas-powered chainsaws have long controlled the industry, battery-powered alternatives have made significant strides in performance, functionality, and sustainability. Amongst these, heißwasser Hochdruckreiniger kaufen the Makita battery-powered chainsaw has become a market leader, offering features that deal with both experts and amateur forest enthusiasts. This blog site post will dive into the crucial elements of the Makita battery-powered chainsaw, explore its advantages, and supply vital info for potential buyers.

Summary of Makita Battery-Powered Chainsaws
Makita, a highly regarded name in power tools, has actually integrated advanced innovation and user-centric design into its battery-powered chainsaw lineup. These chainsaws are powered by the business's extensive series of lithium-ion batteries, using sufficient power to manage hard jobs without the inconvenience associated with gas-powered models.
Secret Features and Specifications
| Feature | Design XCU03PT1 | Design XCU04PT1 |
|---|---|---|
| Motor Type | Brushless electrical motor | Brushless electric motor |
| Bar Length | 12 inches | 14 inches |
| Chain Speed | 1,650 FPM | 1,650 FPM |
| Battery | ( 2) 18V LXT ® Lithium-Ion | ( 2) 18V LXT ® Lithium-Ion |
| Weight (with battery) | 10.1 pounds | 10.4 pounds |
| Noise Level | 92 dB | 93 dB |
| Automatic Oiling | Yes | Yes |
| Chain Tensioning | Tool-less | Tool-less |
Benefits of Using Makita Battery-Powered Chainsaws
1. Ecological Friendliness
Among the most compelling advantages of battery-powered chainsaws, consisting of those from Makita, is their environmental impact. They produce no emissions during operation, making them an accountable option for eco-conscious users. This is especially crucial for domestic areas where noise and contamination may worry neighbors.
2. Quieter Operation
With sound levels generally lower than gas-powered chainsaws, haaga kehrmaschine erfahrungen Makita's battery-powered models allow users to work without disrupting the peace of their surroundings. This makes them ideal for rural environments or noise-sensitive areas.
3. Relieve of Use
The lightweight style and lack of cables make Makita battery-powered chainsaws simple to maneuver. Additionally, the tool-less chain tensioning system streamlines maintenance, making it easy to use even for those brand-new to chainsaw operation.
4. Immediate Start-up
Unlike gas-powered chainsaws that require priming and pulling a cord, battery-powered designs deliver immediate power with the push of a button. This feature saves time and reduces aggravation, especially for users who require instant access to their tools.
5. Lower Maintenance Costs
Battery-powered chainsaws need less maintenance than their gas counterparts. Users do not have to fret about fuel mixes, stimulate plugs, or carburetor cleaning, resulting in overall reduced maintenance costs and time.
What to Consider When Choosing a Makita Battery-Powered Chainsaw
When choosing a Makita battery-powered chainsaw, buyers must think about aspects such as:
1. Bar Length
The needed bar length depends on the types and sizes of cuts you will be taking on. For small jobs and branches, a much shorter Hochdruckreiniger 150 Bar (e.g., 12 inches) will be adequate, while larger, more requiring tasks might require investments in chainsaws with longer bars.
2. Battery Compatibility
Make sure compatibility with Makita's 18V LXT ® Lithium-Ion batteries. Invest in extra batteries for extended usage. Battery runtime is important-- consider how numerous amps a battery offers to understand its longevity and how it matches your workload.
3. Weight
Weight plays a considerable function in maneuverability. Lightweight chainsaws offer convenience during extended use. Nevertheless, balance and stability should also be thought about, as excessively light tools may have less power and control.
4. Service warranty and Support
Makita normally supplies service warranties ranging from one to three years on their tools. It's worth investigating the specifics of each design and ensuring you comprehend the maker's assistance network must issues occur.
Operational Safety and Best Practices
Utilizing a chainsaw can be dangerous if proper precaution are not taken. Below are important security suggestions for running a Makita battery-powered chainsaw:
- Always wear protective gear: gloves, goggles, ear defense, and chainsaw chaps are essential.
- Inspect the chainsaw before usage: inspect for any damage and ensure that the chain is appropriately tightened and lubricated.
- Keep a safe range from onlookers, specifically children and animals.
- Never ever use the chainsaw overhead or in unstable positions, which can lead to loss of control.
FAQ Section
Q1. For how long does the battery last on a Makita battery-powered chainsaw?
A: The battery runtime can vary based upon how heavy the chainsaw is being utilized, the battery capability, and the conditions of the task. Typically, users can anticipate about 30-100 minutes of runtime per charge.
Q2. Do Makita battery-powered chainsaws included batteries included?
A: Most Makita battery-powered chainsaws featured at least one battery and a charger as part of the package. Nevertheless, Chainsaw Test some bare tool models require different purchase.
Q3. Can I use my Makita batteries on other tools?
A: Yes, Makita's 18V LXT ® Lithium-Ion batteries work with a large range of other Makita tools, making it convenient to have several tools that share batteries.
Q4. How do I maintain my Makita battery-powered chainsaw?
A: Regular upkeep consists of cleaning up the chain and guide bar, inspecting chain stress, oiling the chain, and examining the battery contacts and terminals.
Q5. Is it possible to sharpen the chainsaw chain?
A: Yes, chainsaw chains can be honed. It is a good idea to use a chainsaw sharpening tool or take it to a professional if you're unskilled.
The Makita battery-powered chainsaw represents a significant enhancement in the field of power tools, merging portability, performance, and environmental duty into an user-friendly package. Whether for professional or personal jobs, these chainsaws offer reputable performance for a large range of cutting needs. With the right knowledge and tools, users can enjoy the benefits of this ingenious innovation while ensuring safety and effectiveness. Before purchasing, thoroughly consider your distinct requirements and Stihl Hochdruckreiniger RE 130 Plus don't be reluctant to check out the different models that Makita needs to offer. Delighted cutting!

The Versatility of Trio Bunk Beds: A Comprehensive Guide
Trio bunk beds use an ingenious sleeping solution ideal for households, hostels, and getaway rentals. These distinct beds present the ideal compromise between space-saving and convenience, making them a precious choice for parents and company owner alike. This blog site post will explore the various aspects of trio bunk beds, including their style, advantages, essential factors to consider when acquiring, and frequently asked concerns.
What Are Trio Bunk Beds?
Trio bunk beds, often described as Triple Bunks bunk beds, generally include three sleeping levels. Unlike standard bunk beds that stack just two beds, trio bunk beds include a 3rd bed either on the top or as a pull-out option. They can be found in different setups, consisting of:
- Triple Bunkbeds-Stacked: Three beds arranged vertically.
- L-Shaped: Two beds stacked horizontally with a 3rd positioned perpendicularly, looking like an 'L' shape.
- Lofted with a Mattress Below: A raised bunk bed with a versatile sleeping location listed below that can include a mattress.
Here's an easy table outlining various designs of trio bunk beds:
| Style | Description | Advantages |
|---|---|---|
| Unique Triple Bunk Beds-Stacked | Straight vertical positioning of three beds | Space-saving, ideal for little rooms |
| L-Shaped | Two vertical and one horizontal bed | Much better accessibility, special design |
| Lofted with Below | One raised bed with area for a mattress listed below | Multi-functional, great for play or research study locations |
Benefits of Trio Bunk Beds
Trio bunk beds offer numerous benefits, making them a practical option. Here's a list of their crucial benefits:
1. Space Efficiency
Trio bunk beds are ideal for maximizing space in small rooms. Their vertical design supports multiple sleepers without using up additional floor area.
2. Versatility
They can accommodate numerous arrangements to suit different room layouts, enabling for creative styles that fit individual choices.
3. Cost-Effectiveness
Purchasing a trio bunk bed can be more cost-effective in the long run. It serves as an option for several sleeping plans, decreasing the requirement to purchase extra beds.
4. Ideal for Kids
For families with several kids, trio Bunk Bed Triple beds can transform a shared bed room into a practical and enjoyable area. The upper bunks can be used for sleeping, while the lower area can act as a backyard.
5. Great for Guests
They are ideal for guest rooms, especially in vacation rentals or lodges, enabling versatile sleeping plans without inhabiting excessive space.
Secret Considerations When Purchasing Trio Bunk Beds
While trio bunk beds are an appealing option, picking the right design is vital. Here are some aspects worth considering:
1. Security Features
Search for beds with tough guardrails and correct ladder style. Safety must constantly be a concern, especially for kids.
2. Room Size
Guarantee to determine your space before purchasing. Consider the height of the ceiling, as high beds require adequate clearance above.
3. Weight Capacity
Check the weight limits for each mattress level to ensure they meet the needs of the desired sleepers.
4. Mattress Type
Some bunk beds require particular mattress types or densities. Guarantee the mattresses are comfortable and properly fitted.
5. Sturdiness
Select products that withstand wear and tear. Strong wood or quality metal frames are usually more durable.
The following table sums up necessary factors to think about when buying trio bunk beds:
| Factor | Importance | Secret Suggestions |
|---|---|---|
| Safety Features | Important for user protection | Try to find guardrails and sturdy ladders |
| Space Size | Determines the very best fit | Step before acquiring |
| Weight Capacity | Makes sure beds are structurally sound | Check requirements |
| Mattress Type | Affects convenience and fit | Choose appropriate sizes/types |
| Resilience | Influences longevity and maintenance | Buy strong products |
Frequently Asked Questions (FAQs)
1. Are trio bunk beds safe for children?
Yes, when geared up with safety functions such as guardrails, strong ladders, and appropriate weight capacities, trio bunk beds can be a safe choice for children. Parents ought to supervise children and guarantee they understand how to utilize the bed securely.
2. What age is suitable for sleeping in the top bunk?
It's generally advised that kids under 6 ought to not sleep in the leading bunk. Constantly make sure that kids can safely using ladders and know the prospective dangers involved.
3. How do I keep a trio bunk bed?
Frequently check for loose screws, tighten bolts, and examine for any damages. Tidy the bed frame regularly to ensure its durability.
4. Can trio bunk beds be separated?
Some styles enable private beds to be separated if that is preferred. Constantly speak with the maker's instructions or requirements.
5. Where can I buy trio bunk beds?
Trio bunk beds can be discovered at furniture merchants, both in-store and online. Websites such as Amazon, Wayfair, and IKEA provide numerous options and styles to pick from.
Trio bunk beds supply a perfect service for area obstacles while using comfort and adaptability. They are particularly useful for households, visitor accommodations, or compact living situations. Assessing the design, security functions, and resilience can guarantee the best choice for specific needs and preferences. Whether it's for kids' spaces or extra guest space, a trio bunk bed might be the best addition to enhance any home or rental.
By considering these factors and understanding the numerous advantages, you can make a notified choice on including a trio bunk bed into your living area. Welcome the possibilities of taking full advantage of area and making shared sleeping areas pleasurable for all!
Unveiling the Ultimate Drill Special Offer: Everything You Need to Know
Drills are an important part of any DIY enthusiast's toolkit, serving numerous functions from family repair work to serious construction jobs. For those looking to purchase a brand-new drill, there has actually never been a more opportune minute than now, with a stellar special offer currently readily available. In this blog post, we will dig into the information of this drill special offer, talk about the offered types of drills, and provide important pointers to choose the best one for your needs.
The Drill Special Offer: An Overview
The current drill special offer features an extensive selection of drills-- ranging from cordless to corded choices, and covering both standard and hammer drills. In addition, bonus offer products, such as drill bit sets, bohrmaschine günstig Akkubohrmaschine Kaufen (pad.stuve.uni-Ulm.de) batteries, and bring cases, might also be included depending on the selected drill.
| Drill Type | Market price | Special Deal Price | Bonus Offer Items Included |
|---|---|---|---|
| Cordless Drill | ₤ 120 | ₤ 89 | Drill Bit Set, Carrying Case |
| Corded Drill | ₤ 90 | ₤ 69 | Additional Battery |
| Hammer Drill | ₤ 150 | ₤ 119 | Drill Bit Set, Carrying Case |
| Compact Drill | ₤ 75 | ₤ 49 | None |
All rates are indicative and may vary based on seller promos. Please contact the merchant for the most precise prices.
Types of Drills Available
When choosing a drill, it's vital to comprehend the various types readily available, as they cater to numerous jobs and user choices.
Cordless Drills
- Description: These models are charged via batteries, permitting high adaptability and ease of usage.
- Best For: DIYers who require portability and versatility in motion.
Corded Drills
- Description: These drills require an electrical outlet and typically offer more power than cordless models.
- Best For: Heavy-duty work where sustained performance is essential.
Hammer Drills
- Description: These are specialized drills capable of delivering a hammer action, perfect for drilling into hard products such as concrete.
- Best For: Professionals and serious DIYers working with tougher products.
Compact Drills
- Description: Smaller and lighter than regular drills, these are ideal for tight spaces.
- Best For: Tasks that require accuracy and Akkubohrschrauber control in limited areas.
Benefits of Taking Advantage of This Offer
Cost Savings: The special offer substantially reduces the costs, permitting customers to acquire quality tools at lower costs.
Benefit Items: Included reward products such as drill bit sets or bring cases boost the general value of each purchase.
Quality Options: This offer covers a range of drill types, Buy tools online guaranteeing that both the casual DIYer and the seasoned professional discover what they need.
Improved Performance: Investing in a quality drill not just makes jobs easier however also increases efficiency and elektro bohrmaschine, Telegra.ph, security.
How to Choose the Right Drill
Picking the right drill depends on various elements associated with the user's needs and the jobs at hand. Here are the actions you can require to make a notified choice:
Determine the Intended Use:
- Identify whether you'll be dealing with light tasks (like assembling furniture) or much heavier tasks (like installing shelves in brick walls).
Assess Your Power Needs:
- For heavy-duty work, think about a corded drill or a hammer drill. For personal usage and portability, a cordless drill is ideal.
Examine Battery Life:
- If selecting a cordless drill, think about the battery's voltage and runtime. Higher voltage normally implies more power and longer use before needing a recharge.
Search For Ergonomic Features:
- A comfy grip and light-weight model can make a distinction throughout extended use.
Read Reviews:
- Conduct research on customer feedback and ratings to gauge the dependability and efficiency of the drill.
Often Asked Questions (FAQ)
What is the difference in between a cordless and a corded drill?
Cordless drills are battery-powered and offer the advantage of movement without cables. Corded drills count on a direct source of power and are usually more powerful however limitation movement and range.
Can a hammer drill be utilized as a routine drill?
Yes, a hammer drill can be used in regular drilling mode by disabling the hammer function. However, basic drills can not replicate the hammering action of a hammer drill.
How do I maintain my drill?
Regular maintenance includes cleaning the chuck, checking battery health (for cordless drills), and making sure all screws and parts are tight. Store drills in a cool, dry place.
Are the perk products worth it?
Yes, perk items like drill bit sets can save you additional expenses while providing the needed tools to get your tasks began instantly.
Overall, the present drill special offer supplies an amazing chance for both seasoned professionals and weekend DIY warriors to purchase top quality tools at competitive rates. By understanding the types of drills available, the advantages of this offer, and Impact drill comparison how to choose the best drill for your requirements, customers can make informed decisions that boost their home improvement experience.
Make the most of this limited-time offer and raise your DIY projects with a reputable drill that matches your specific requirements. Happy drilling!